Wednesday, January 11, 2017

Vanilla-Grapefruit Shortbread, January 11, 2017

Such a long time since my last post!  In the last six months, I have returned to nursing full time (medical insurance is expensive, as most of you well know!), had surgery for a rotator cuff tear and lived through a total deck teardown/rebuild.  I"ve been out of my shoulder immobilizer for only 2-3 weeks.  Interesting times!

November 10 through Christmas, I was in a shoulder immobilizer.  That was a killer for me!  I SO wanted to make at least 50 kinds of Christmas cookies, lol.  I did manage to make Vanilla-Grapefruit Shortbread left-handed (yay, me!).  It's mixed in a food processor, then pressed into a 9-inch springform pan.  Easy to do one handed.  :-)  I found the recipe in Bon Appetit.


Vanilla-Grapefruit Shortbread

Makes 16

Ingredients

½ cup (1 stick) unsalted butter, room temperature, cut into pieces, plus more for pan
1 tablespoon finely grated grapefruit zest
1 teaspoon vanilla extract
⅓ cup plus 1 cup powdered sugar
1 cup all-purpose flour
½ teaspoon kosher salt, plus more
2 tablespoons fresh grapefruit juice
Himalayan pink salt, dried hibiscus flowers, red sprinkles or sanding sugar, dried rose petals, and/or cracked pink peppercorns (for serving; optional)

Special Equipment: A 9-inch springform pan

Preparation

Lightly butter pan. Pulse grapefruit zest, vanilla extract, ½ cup butter, and ⅓ cup powdered sugar in a food processor until smooth and homogenous. Add flour and ½ tsp. kosher salt; pulse just to combine. Press dough evenly into prepared pan, smoothing top with a flat-bottomed glass or measuring cup. Chill until firm, about 1 hour.
Preheat oven to 350°. Prick shortbread all over with a fork 1"–2" apart, and bake until edges are golden and center is pale but firm to the touch, 15–18 minutes.
Remove band from pan and immediately cut shortbread into 16 wedges. Let cool.
Whisk grapefruit juice, a pinch of kosher salt, and remaining 1 cup powdered sugar in a small bowl until smooth. Spread a thin layer of icing over shortbreads with a small offset spatula, leaving a thin border of crust exposed. Top as desired. Let sit 10–15 minutes to allow glaze to set. Retrace cut marks.
Do Ahead: Dough can be pressed into pan 1 day ahead. Cover and chill.

I used a Hawaiian Sea Salt from Molokai (which is kind of a brick color).  Any of the mentioned toppings would not only taste good but also make the shortbread very pretty.  Easy and well worth it.

Saturday, June 18, 2016

Must-make summer dishes, June 18, 2016

Hello, all!  I have moved my blogging to my new website-www.aprilcookstonight.com.  You can hop over to my website anytime to read new blogs.  I hope to have a newsletter going soon as well.  I am trying to link the two sites, this one and aprilcookstonight.com but have not been very successful to date! :/

So...I am reprinting the blog I just did for all of you to read:

 I get a TON of emails, a lot of which revolve around food, food prep, packaging, etc, every day.  Sometimes it's exciting to look through them (I'm always looking for new favor ideas, the latest food craze and new recipes) and sometimes they are a rehash of older food ideas or articles.

One of the emails I always enjoy looking at are the ones from thekitchn.com.  They always have great ideas and it has been exciting watching the emails and website evolve into an increasingly sophisticated site.  


The most recent email I received had an article titled "22 things you need to eat before the end of summer." You can click on the title to see the complete article.  I'll cover just two that caught my eye.


I love the Creamy Zucchini Fettuccini!  What's not to love about zucchini?  It's versatile in so many ways.  It can be sweet or savory.  You can serve it in plain site or hide it in a muffin or cake.  This recipe offers up a creamy pasta with an alfredo sauce spiced up with chopped zucchini and red pepper flakes.  Oh, and did I mention it comes together in about 20 minutes?  Great for weeknights or a quick weekend dinner.


Another recipe in this article is a dessert, perfect for using those luscious summer strawberries and impressive enough to serve to guests.  They call it "Towering Strawberry Shortcake".  YU-UM!


You can make it a two layer cake (the chiffon cake recipe is included) or you can double the recipe to make it a four layer cake.  Either way, it's not as hard as it sounds and trust me, your guests will enjoy either version.  The surprise in this recipe is the basil whipped cream.  Before you turn your nose up at this addition-just try it.  Adding herbs to old standby recipes often adds the boost needed to send the recipe over the top.  And it's not hard to do.  I challenge you to give it a try!  

And check out the way the strawberries are sliced--some have the tops left on, some are sliced in half, other strawberries are sliced, some are sliced side up, some are sliced side down.  This gives a nice variation in color and texture and is what makes this dessert even more interesting.  It's the little things that add to the beauty of a dish when you put them all together.


There are 22 recipes in all-from alcoholic drinks to salsa to main dish to dessert.  Check them out and brighten up your summer meals!  


Pictures courtesy of thekitchn.com.

Sunday, April 24, 2016

Shhhh...."don't tell them it has prunes" spice cake, April 24, 2016

I am embarrassed to look at this blog and see it has been months (months!!?!) since I have posted.  Not good.  I have been in the process of rebranding myself and creating a new website.  Hopefully it will be published in the next few days at www.aprilcookstonight.com.  I hope you'll check it out something this week! 

I have told myself I need to be more consistent in blogging, and I could give you all the reasons one should blog when you have a business, but you already likely know those things.  My blog will also be right on my website but I will connect this blog site to that as I have so many entries on this site, plus some great memories!  I hope you will continue to stick with me. :-)


I was talking to one of my personal chef clients recently about the prune cake Ree Drummond (aka The Pioneer Woman) makes-her "Iny's Prune Cake."  She insisted it was really good so I was thinking of trying it.  He then shared that his mother (now deceased) had also had a recipe for prune cake and asked if I would make it for him.  I'm game, why not?

The recipe called for Mocha Frosting as well, most unusual for a prune cake, but my client insisted it was great.  Ok, says I.  

Turns out he and mom were right.  It makes a great combination!  And now, I get to share that recipe with you.  You can also try The Pioneer Woman's cake to compare.  Let me know what you think....

Pat's Prune Cake with Mocha Frosting

Yield: 8-10 servings

Ingredients:
Butter, for greasing the pan
8 oz pitted prunes
1 1/2 cups all-purpose flour
1 1/2 teaspoons baking soda
3/4 teaspoon ground cloves
1 teaspoon ground cinnamon
1/2 teaspoon salt
1 cup of shortening, room temperature (I use butter but you can also use Crisco)
1 cup sugar
1 teaspoon vanilla extract
2 eggs, room temperature
1/2 cup buttermilk, room temperature
1/2 cup broken nut meats, optional

Preparation:
1. For the cake: Preheat the oven to 375 degrees F.  Butter two 8 or 9-inch cake pans and set aside.
2. Place the prunes in a small saucepan.  Cover them with water.  Bring to a boil, then simmer until they are soft and mashable, about 8 minutes.
3. Drain the water from the prunes, then mash or puree them.  Set aside to cool.
4. Sift together the flour, baking soda, salt, cinnamon and cloves.
5. In a separate bowl, beat the shortening or butter until creamy, then add the sugar gradually.  Beat in the eggs, one at a time, then add the vanilla.  Add the prune puree.
6. Combine the wet and dry ingredients in increments of 1/3, alternating the flour mixture with the buttermilk, mixing until smooth.  Stir in the nuts, if using.
7. Pour the cake batter into the prepared baking pans and bake for 25-30 minutes.  Do not overbake the cake.  You want it to be nice and moist.  
8. Remove from the oven when a toothpick inserted in the center comes out clean.  Move the pans onto a wire rack to cool for 10, then turn out cakes directly onto the wire rack to completely cool.  

Mocha Frosting

Ingredients:
1/2 cup butter, softened
1/4 cup of heavy cream
3 cups powdered sugar
1/2 teaspoon salt
1 teaspoon vanilla extract
2 Tablespoons cocoa (or 2oz melted semi-sweet chocolate)
3 Tablespoons strong hot coffee, or 1-2 Tablespoons of instant espresso powder

Preparation:

1. Sift the powdered sugar, set aside.  Beat the butter and the cream until soft, then gradually add the powdered sugar gradually.  Blend until creamy.  Add the salt, the cocoa and the coffee and beat for 2 minutes.
2. Allow the icing to cool, then add the vanilla.  Permit the frosting to stand for 5 minutes, then beat it again.  Frost your cake.  Serve and eat!


Saturday, February 20, 2016

Dessert and Great Bread-What more does a girl need? (Saturday, February 20, 2016)

Hello, and happy February!

It's finally warming up here (after a sudden snow storm this past week!) and Ah Choo (my rag doll cat) has been wanting to spend more time out on the deck.  (My sister took this picture.  It looks like a studio portrait, doesn't it?)


He gets to watch the neighbor's dogs and watch the birds fly by.  While he was sitting out there this morning, a pigeon came to sit on one of the pillars.  My first thought was-"Don't you realize there's a cat sitting a few feet away?!"  Apparently not, although Ah Choo tried very hard to reach him, chattering at him the entire time.


Since I was unable to go to Hawaii this winter to cook for my personal chef client (alas, the downside of working at what Jordan calls a "real job"), I was available to make Valentine's Day desserts at Gas Lamp restaurant.  We decided on Eton Mess (what could be better than whipped cream, strawberries and meringue?  OK....maybe chocolate!) and Chocolate Cupcakes with Chocolate Cream Cheese frosting.  The cupcake recipe came from the cookbook, "Cupcake Diaries" from DC Cupcakes. All my desserts sold out!!  YAY!


I've started to bake bread again, trying to make a more palatable whole grain loaf.  I still really like using Jim Lahey's "no knead bread" recipe consisting of 3 1/2 cups of bread flour, 1 1/2 cups of lukewarm water, 1 1/2 tsp salt and 1/4 tsp yeast.  I have found, however, that using whole grains requires more yeast so for this loaf, so increased the yeast to 1 tablespoon.  I also increased the salt to 2 teaspoons, which improved the taste of the bread.  

So, I used 1 3/4 cups of bread flour, 1 3/4 cups emmer flour (considered an ancient grain), 1 1/2 cups of water, 1 tablespoon of yeast and 2 teaspoons of salt to make my bread dough.  Mix it all together, and let it sit on the counter, covered with plastic wrap, for 12-16 hours.


Its ready to shape into a loaf when the dough has risen and is bubbly and smells a little like fermented alcohol.  It makes its own "biga" while it sits on the counter, hence the need (usually) for little yeast.  I used a pastry scraper to get it out of the bowl and onto the floured counter and shaped it into a boule.  I also like the way Jim Lahey bakes his bread in a preheated Dutch oven inside a hot oven.  This method gives you an artisan looking loaf just like you'd get at an artisan bakery.  Here are the results:


I finally got a two thumbs up on flavor from Jordan.  It was good-makes great toast too!

Totally not food related, but my best friend is coming to town next Sunday and we're taking a girl's road trip through northern California.  Can't wait!  Reno to San Francisco then up the coast.  Gorgeous country.  And time with my best friend!  I'll take plenty of pictures. :-)

Til next time-Bon Appetite!


Tuesday, January 26, 2016

January 26, 2016

Hello, all!  It's a lovely, sunny (but very cool) day in Nevada.  I, however, am stuck indoors, sick, so figured it was time to slow down and write another blog.

I also blog once a month with a group of chefs I met while doing cooking demos for Wolf-SubZero products.  Couldn't ask for a lovelier group of women!  Our blog site is www.cookingwithsteam.com.

This recipe was my post from earlier in the month.  These Apple Pastry Roses are so much fun and so easy, I had to add the recipe here.

A few weeks ago I was in the mood to be creative and remembered a post I saw on Facebook demonstrating how easy it is to make pastry roses using puff pastry and sliced apples.

Hmmm…great idea!  I had puff pastry in the freezer and apples sitting on the counter. And---I wanted to do something nice for the girls at work. (There are some advantages to working with a chef, lol)


First,  thaw the puff pastry (1-2 hours in the refrigerator or 30-45 minutes on the counter).  Preheat your oven to 375 degrees F. Then I cut two red apples in half, cored them and sliced them into thin slices. This can be done by hand or with a Mandolin. The apple slices need to be soft in order to be “rolled” into a rose shape.   You can peel them or not, it’s a personal preference.  If you are using red-skinned apples, the red adds more to the illusion of an actual “rose” in appearance.  Either way, your pastry will be tasty.


Next I placed the apple slices into a microwave-safe bowl with some lemon water and microwaved them for about 4 minutes.  Drain the apples, discarding the lemon water.  You can add a small bit of sugar and/or cinnamon at this point to further flavor the apples.


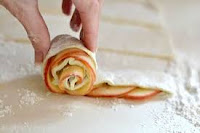
Unroll your thawed puff pastry onto your lightly floured work work surface.  Cut each sheet into six strips. Spread apricot jam over the cut strips, then lay the apple slices (overlapping slightly) at the top of the strip so that a portion of the round end of the apple is above the edge of the puff pastry stip.  Fold the opposite side of the puff pastry strip onto the bottoms of the apple slices, then roll them up slowly, taking care not to displace the apple slices.


Place your apple slices into a muffin tin (this will help them hold the shape much better than “free-forming” the pastries on a baking sheet).  Bake them at 375 degrees F for 20-25 minutes, or until golden brown.  Let them cool in the pan for about 5 minutes, then remove them from the pan to cool on a wire rack.  By taking them out of the pan to cool, the pastry roses won't get soggy bottoms. Before serving, dust your Apple Pastry Roses with powdered sugar and serve.  They are YUMMY!


Last weekend, Jordan and I drove to San Francisco to attend the Fancy Food Show.  Technically it started Sunday, but we drove down Friday so we could attend classes on Saturday.  They offer all kinds of education for people who want to bring food products to the market but also help those already in the food business.  It was very informative, covering everything from packaging, pricing, labeling, to food trends, what age groups are buying what (millenials, GenX, etc), co-packers, distributors, brokers, and on and on...

And then there were the vendors from all over the world!  Vendors who sold spices, coffee, chocolate, candy, snacks of every variety, healthy, organic, vegan, vegetarian, cured meats (charcuterie), cheeses of every kind and variety, cookies, baked goods, crackers, soups, gluten-free products, wine, alcohol,...  I could go on and on.  It was almost overwhelming, there was so much to see and try!

We had heard about a vendor that had a product that used bugs as a source of protein.  Animals that we eat as a source of protein take 75% of the world's resources but only feed 25% of the world's population.  That means there are people looking for alternative sources of protein, like vegetables and insects.  Turns out the woman who had the "bug product" went to Harvard and studied African studies.  Which meant she spent some time in Africa, ate bugs, and discovered they weren't that bad.  Huh..  So she and another Harvard grad came up with chips made with cricket flour, corn flour, flax, and a few other things and there she was.  There were 3 different flavor profiles.  Jordan and I decided to be brave our last day and try the chips.  Not bad, not bad.  Funny after taste, not a bad taste, but one that is hard to describe.  Just different.

While we were in San Francisco, we had a chance to eat out a few times.  We ate Franch food at Mathilde French Bistro, Italian food at Buca di Beppo, and Ethiopian food at Sheba's Piano Bar and Lounge.  We met the owner at Sheba's as well, lovely woman!  She seated us and then stayed and talked a while (it was kind of early and we were the first customers, lol).

That's all that's going on in my world right now.  Hope you try the "roses," they really are tasty!

Friday, January 1, 2016

January 1, 2016


Can you believe it is now 2016?  Me neither!

December held several catering jobs for me, although I also turned down two that just didn't seem to "feel right" to me.  The kind where you see red flags associated with client requests.  I've learned over time to listen to those feelings.  Better off happier with fewer jobs than crazy busy and unhappy!

I did get a new car.  The winter so far has been snowy and cold and my little Miata die not do well in the snow.  Since I drive to Carson City (about 40 miles round trip) at least three days a week, it made sense to get a car that could handle bad weather better.  So....I opted for a Kia Soul.  In Alien Green, lol.   Cute, right?


I did not bake as many Christmas cookies as I had hoped to either.....  I did, however, have a last minute cookie order and one of the cookies I made were these Glazed Lavender Cookies.  They really turned out well!  And the recipe is very easy.

Lemon-Glazed Lavender Shortbreads

Ingredients:

1 cup unsalted butter, room temperature
2 cups all-purpose flour
1/2 cup superfine sugar
1/2 teaspoon salt
2 tablespoons dried lavender
1 cup powdered sugar
1/2 cup freshly squeezed lemon juice

Preparation:

1. Preheat your oven to 300 degrees F.  Line two baking sheets with parchment paper and set aside.

2. Cream the butter in an electric stand mixer until fluffy.  Add the flour, sugar and salt and beat on low speed for about 1 minute.  Add the lavender, beating just until the lavender is incorporated.

3. Transfer the dough onto a floured work surface and roll it out with a rolling pin to about 1/4 inch thickness.  Cut out the cookies using a round cookie cutter (or cookie cutter of your choice) and place 1 inch apart on a cookie sheet lined with parchment paper.

4. Bake on the center rack of your preheated oven for 20 minutes.  You should not let these cookies brown.  Remove from oven and let cool on a wire cooking rack.

5. Make the glaze by whisking the powdered sugar and lemon juice together.  Spoon about 1 teaspoon of the glaze over each cookie, then spread the glaze to cover the entire top of the cookie.  Let them sit for one hour before serving.  Enjoy!

My Mom, sister, Michele, and nephew, Dylan, came up for Christmas.  It was nice spending time with family.

Christmas dinner was bone-in prime rib (only the second time I have made this but it's surprisingly easy to cook), mashed potatoes, glazed carrots, roasted Brussels sprouts and glazed Delicata squash.  Mom said no dessert, so I put out some of the candy we got as gifts.  All good stuff!  I did NOT get a picture of Christmas dinner this year, can't believe I forgot to do that!

I also made mini Chocolate Cakes for one of my clients and although there was a bit of work involved, they turned out well, if I do say so myself.....


The recipe called for a three layer mini cake, but that seemed just, well, too tall, so I made them with two layers of chocolate cake with chocolate buttercream between the layers, then glazed them over with chocolate ganache.  Before the ganache totally set, I pieced thin chocolate pieces around the edges, a little like a puzzle, and finished off the top with gold sugar crystals.  Beautiful, non?

January looks to be a quiet month, but we shall see.  Still hoping to post more often, and with a little more time on my hands, maybe I'll be able to do just that!  Stay tuned!!!


Sunday, November 29, 2015

Sunday, November 29, 2015

Back at it again, my friends!

Hope you all had a wonderful Thanksgiving.  We decided (gasp!) to out to dinner for Thanksgiving this year.  I've been cooking a lot lately and wanted to be waited on for a change.  :-).  I can't remember the last time we went out for Thanksgiving dinner, although I know we have.  We went to a restaurant called Bricks that has been open for many years now.  Jordan, Janell (my sister) and I dined on turkey with gravy, stuffing, mashed potatoes and green beans.  Janell and I had butternut squash soup as a started (quite good) and finished with pumpkin pie.  Jordan had short ribs-not much of a turkey guy!

My family is coming up from Southern California for Christmas so I'll be doing plenty of cooking then.  Haven't decided whether to have beef or ham or turkey for Christmas.  I am leaning toward a New York roast......

I have a large catering job on Friday, December 4th for one of the medical offices here in Reno (their Christmas party for 50+).  They have ordered appetizers, turkey AND ham, gravy, mashed potatoes, carrots and two different desserts.  Quite the party!  This particular doctor is very generous!

The next week I have a catering job for a Ladies Book Club.  I made them dinner last year and they asked me to do it again this year.  I was asked to cater a dinner party the same night but had to turn it down!  Hard to believe I was asked to do two events in one day.  (I know, a good problem to have!)

I am working on a new project that involves making filled waffles out of puff pastry-good stuff!


The fillings so far have been Baked Italian Omelette, ham and gruyere with a spot of strawberry jam and of course, chocolate.  The filling possibilities are endless!  I'll keep you posted.  

I made another Rose Frasier cake for a client.  Not difficult to do but it has many steps to it.  Apparently the women in his office LOVE this cake, lol.  I've made it several times for them and it is generally gone before lunch!


You take a sponge cake flavored with rose water (or rose extract), split it in half, fill it with fresh strawberries (notice the decorative placement of halved strawberries around the edges) then fill in the excess space with a pastry cream and a voile!)  The blueberries are an added request from my friend.

It's a recipe out of Dorie Greenspan's cookbook, "Baking Chez Moi".  I was gifted this book last Christmas by a friend.  I must admit, on looking through the cookbook for the first time, I felt like Julie in Julie and Julia, the movie about the woman who took a year and made every recipe in Julia Child's French cookbook, blogging about it the entire year.  I wanted to make EVERYTHING in the book!  It all looks so yummy.  And how can you go wrong with Dorie's recipes?!  Needless to say, I have not baked everything but have made quite a few things out of "Baking Chez Moi."  I'll keep working ont it-lofty goal that it is.  

I am about to begin baking for Christmas, both cookies and candy, both of which I sell during the Holiday season.  I make a toffee I call "Simply Crackers Toffee" and currently it is being carried by Wedge Cheese Shop here in Reno.  Part of the crunch comes from crackers.  I originally used saltines but had many requests asking me to make it gluten free, so came up with a recipe using quinoa crispbreads.  Even the people who eat gluten thought it was better with the quinoa!  So, now that's all I use for this toffee and people seem to love it!  Who'd have thunk? 


I finished a new cookbook called "Crepes," which I hope to publish soon on Amazon Kindle.  It's at the editors right now.  Wish me luck!  What do you thing of the cover so far?  I think I am going to move the word "crepes" up to the top so it can be better seen.  I sent the .pdf to my niece to look at since she's the reason I wrote this in the first place and she loved it.  She read it in one sitting, lol.  I'll let you know when it's published.  


That's all for now-see you soon!  Bon Appetit!